Easy Steps for a Secure Ubuntu 18.04 Laptop
December 31, 2019
Outlined here are some easy (and often overlooked) steps, which can greatly increase the security and privacy of your Ubuntu 18.04 laptop.
Encrypted Disk
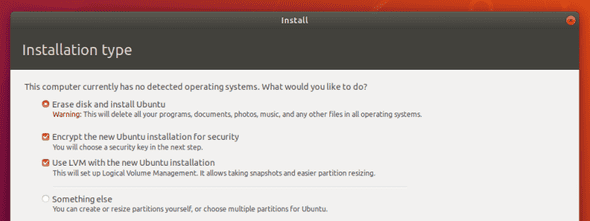
What: Ubuntu 18.04 comes with built-in disk encryption. During the installation, select the “Encrypt the new Ubuntu installation for security” option.
Credit: mikewhatever
- On the next screen, you will be prompted to create a decryption password.
- Finish the installation, and the hard drive will be encrypted whenever the computer is powered off.
Caveats:
- If you need to dual boot, a more advanced configuration is required.
- Make a habit of shutting your computer down whenever it is not in use, this will trigger the encryption process each time and lock in the security benefits.
Why: The physical security of a computer (especially a laptop) is impossible to guarantee, and I don’t want to stress about what files are on my drive at any given moment in time.
Firewall
What: Ubuntu 18.04 comes with Uncomplicated Firewall (UFW).
- After installation, run this command from the terminal:
sudo ufw enable- The firewall will now block all incoming requests and be enabled on startup by default.
Caveat: An unnerving number of programs assume certain ports are open on your machine, and troubleshooting those programs can sometimes take time.
Why: A comprehensive firewall puts you in charge of what requests can be made to your machine from the network.
Virtual Private Network (VPN)
What: OpenVPN is an easy-to-use VPN client that works well with Ubuntu 18.04.
-
Download a
.ovpnfile from your VPN provider.- If your provider does not offer this, follow their specific instructions for setting up an OpenVPN connection, or they may have a native Ubuntu/Debian client.
- After installation, run these commands from the terminal:
sudo apt install openvpn network-manager-openvpn
sudo apt install network-manager-openvpn-gnome- Open Settings
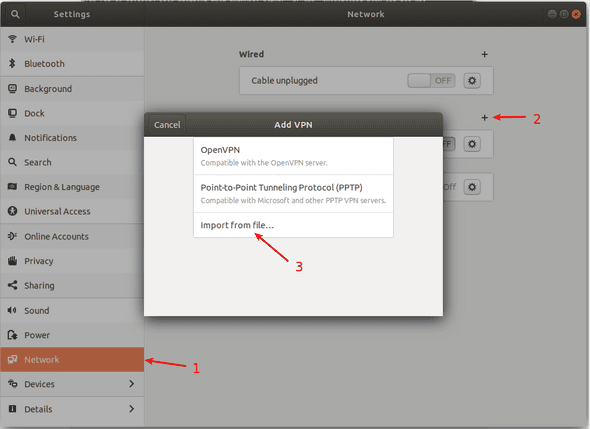
- Navigate to “Network”
- Click the
+icon to the right of the “VPN” heading - Select “Import from file…”
Credit: @thucnc
- Click the “Add” button in the upper right-hand corner of the window to save the connection
- Now, whenever you enable the VPN, your traffic will be tunneled through your provider’s network.
Caveats:
- A VPN connection can slow down your internet speed.
- You must get in the habit of turning on your VPN with any networks you do not trust. You could also look into turning on VPN on unlock.
Why: A VPN is crucial to your right to control the data you leave behind, and on untrusted networks provides a necessary layer of security.
Domain Name System (DNS)
What: Customize your DNS resolution servers.
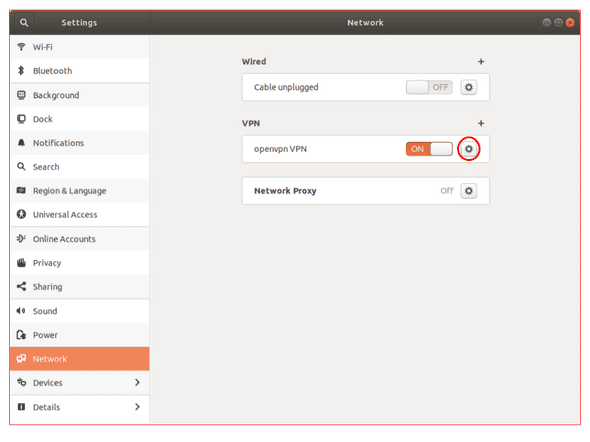
- Open the settings for your VPN connection
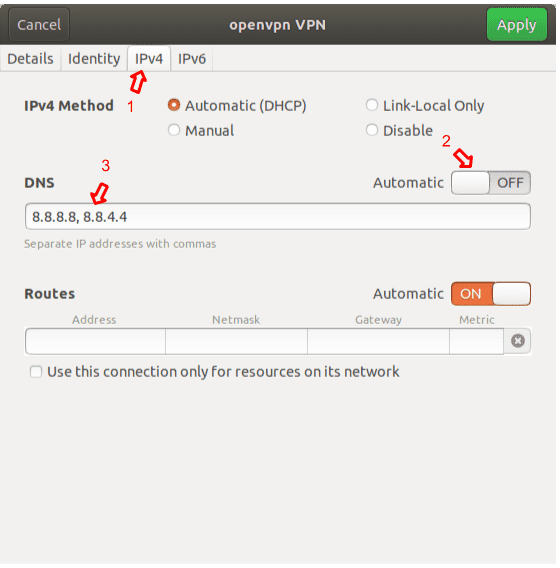
- Select the “IPv4” tab
- Turn off the “Automatic” toggle underneath the “DNS” heading
Add IPs for public DNS of your choice. I use Google’s (
8.8.8.8,8.8.4.4).
- Select the “IPv6” tab
- Turn off the “Automatic” toggle underneath the “DNS” heading
- Add IPs for public DNS of your choice. Again, I use Google’s (
2001:4860:4860::8888,2001:4860:4860::8844). - Click the “Apply” button in the upper right-hand corner of the window.
- Now, whenever you use your VPN, DNS will be handled by the service you chose.
Why: Knowing that you are actually on the sites you think you are, is fundamental to your security online. This also helps lock in the benefits of browsing with a VPN.


